Here is a step-by-step guide on how to change a Dewalt Miter saw blade:
Step 1
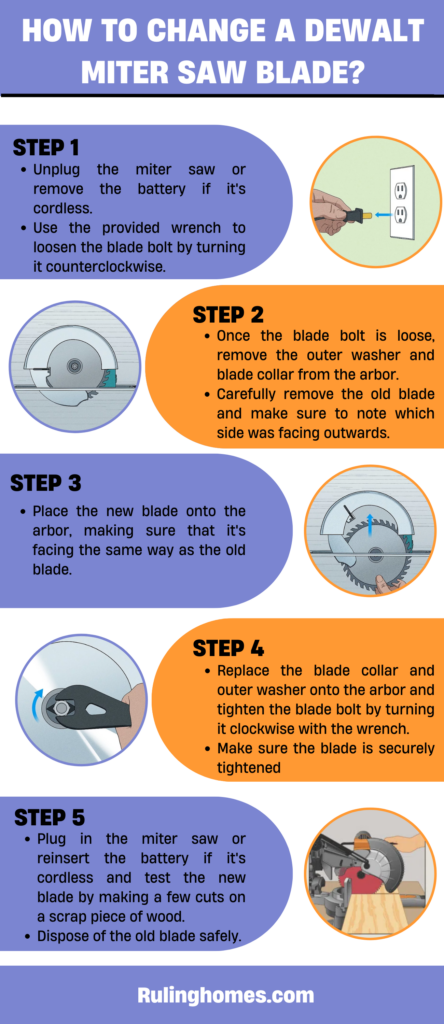
Unplug the Miter saw or remove the battery if it’s cordless.
Step 2
Use the provided wrench to loosen the blade bolt by turning it counterclockwise. Some models may have a locking mechanism that needs to be disengaged before removing the blade bolt.
Step 3
Once the blade bolt is loose, remove the outer washer and blade collar from the arbor.
Step 4
Carefully remove the old blade and make sure to note which side was facing outwards.
Step 5
Place the new blade onto the arbor, making sure that it’s facing the same way as the old blade.
Step 6
Replace the blade collar and outer washer onto the arbor and tighten the blade bolt by turning it clockwise with the wrench.
Step 7
Make sure the blade is securely tightened by checking that it doesn’t wobble or move when pushed lightly.
Step 8
Plug in the miter saw or reinsert the battery if it’s cordless and test the new blade by making a few cuts on a scrap piece of wood.
Step 9
Dispose of the old blade safely, and you have the best Miter Saw ready to work again.
Also Read: Best Miter Saw Stand
Also Read: How to unlock Dewalt Miter Saw
Table of Contents
What are the important considerations while changing the miter saw blade?
When changing the blade on a Miter saw, there are a few important considerations to keep in mind to ensure your safety and the proper functioning of your tool. Here are some important considerations to keep in mind:
Wear protective gear:
Always wear gloves and safety glasses when handling the blade, as well as any other protective gear that the manufacturer recommends.
Disconnect the saw:
Before changing the blade, unplug the saw or remove the battery if it’s cordless to avoid any accidental startup.
Use the correct blade size and type:
Make sure to select a blade that is compatible with your Miter saw and designed for the type of material you will be cutting.
Follow the manufacturer’s instructions:
Always follow the manufacturer’s instructions for changing the blade to ensure that you are doing it correctly and safely.
Tighten the blade bolt properly:
Make sure to tighten the blade bolt properly to ensure that the blade is securely held in place and doesn’t wobble while you use the miter saw.
Check the blade for damage:
Before installing the new blade, check it for any signs of damage, such as chips or cracks. If the blade is damaged, do not use it and replace it with a new one.
Also Read: How to cut crown model through Miter Saw
Conclusion
Changing the blade on a Dewalt Miter saw is a simple process that can be accomplished with a few basic steps.
It’s important to always wear protective gear, choose the correct blade size and type, follow the manufacturer’s instructions, and check the blade for any signs of damage.
By following these important considerations, you can safely and effectively change the blade on your Dewalt miter saw, allowing you to continue using it for a variety of woodworking projects.
Remember to always prioritize safety when working with power tools, and seek professional help if you are unsure about any aspect of the blade-changing process. If you manage safe usage, you can enjoy multiple benefits of a Miter Saw.

I grew up on a small farm in New Jersey. We had a big family because my parents, my uncles and aunties all were living together on this farm so, you can imagine, it was always over crowded with people. But living in farm was really great because we had to do everything on our own and I learned so many things from my parents and uncles and aunties and that is where I found my passion for fixing things, whether it is renovating or designing, I was always there. Read more