Removing vinyl flooring can be a necessary step in preparing a room for new flooring or repairing a damaged subfloor.
It’s important to follow proper safety precautions when removing vinyl flooring, especially if asbestos is a concern.
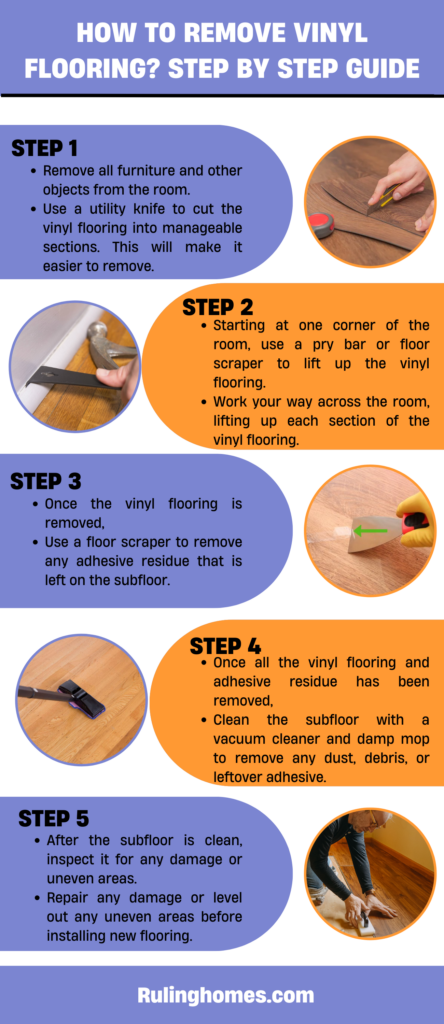
Here is the step-by-step guide on how to remove vinyl flooring:
Step 1
To install the best vinyl flooring, remove all furniture and other objects from the room. This will give you space to work and prevent any items from being damaged during the flooring removal process.
Step 2
If the vinyl flooring was installed prior to the 1980s, it might contain asbestos. You can have the flooring tested for asbestos by a professional testing service.
Step 3
Use a utility knife to cut the vinyl flooring into manageable sections. This will make it easier to remove.
Step 4
Starting at one corner of the room, use a pry bar or floor scraper to lift up the vinyl flooring. Work your way across the room, lifting up each section of the vinyl flooring.
Step 5
Once the vinyl flooring is removed, use a floor scraper to remove any adhesive residue that is left on the subfloor. You can also use a heat gun to soften the adhesive and make it easier to scrape off.
Step 6
Once all the vinyl flooring and adhesive residue have been removed, clean the subfloor with a vacuum cleaner and damp mop to remove any dust, debris, or leftover adhesive.
Step 7
After the subfloor is clean, inspect it for any damage or uneven areas. Repair any damage or level out any uneven areas before installing new flooring.
Precautions one should take while removing the vinyl flooring
When removing vinyl flooring, it’s important to take appropriate safety precautions to protect yourself from potential hazards. Here are some precautions to keep in mind:
Wear protective gear: Wear gloves, eye protection, and a respirator or mask to protect yourself from dust and fumes.
Test for asbestos: If the vinyl flooring was installed prior to the 1980s, it might contain asbestos. Have the flooring tested by a professional before removing it.
Ventilate the room: Open windows and doors, and use fans to create ventilation and help clear out any dust or fumes.
Cut the vinyl flooring into small sections: This will make it easier to remove and reduce the risk of tearing or breaking the flooring.
Dispose of the flooring properly: Asbestos-containing vinyl flooring must be disposed of as hazardous waste. Follow local regulations for disposing of the flooring safely.
Clean up thoroughly: After removing the vinyl flooring, clean up any dust or debris thoroughly using a vacuum cleaner and damp mop.
Conclusion
Removing vinyl flooring can be challenging, but by following the right steps and taking appropriate safety precautions, you can complete the job effectively and safely.
Whether you’re updating the look of a room or addressing water damage or asbestos concerns, removing vinyl flooring is an important step in preparing the room for new flooring or repairing a damaged subfloor.
Remember to wear protective gear, cut the vinyl flooring into small sections, and properly dispose of any hazardous materials.
By following these precautions and cleaning up thoroughly, you can successfully remove vinyl flooring and prepare the room for its next phase.

I grew up on a small farm in New Jersey. We had a big family because my parents, my uncles and aunties all were living together on this farm so, you can imagine, it was always over crowded with people. But living in farm was really great because we had to do everything on our own and I learned so many things from my parents and uncles and aunties and that is where I found my passion for fixing things, whether it is renovating or designing, I was always there. Read more