Using the airless paint sprayer is easy if you follow these steps carefully. First of all, you need to prime the pump. The next step is to fill the hose and gun.
Once you fill the house and the gun, you need to adjust the pressure and use a spraying motion to spray the surface you need to paint. The working of an airless paint sprayer is just as simple.
Let us discuss these steps in some detail:
Table of Contents
Step by Step Guide for Using an Airless Paint Sprayer:
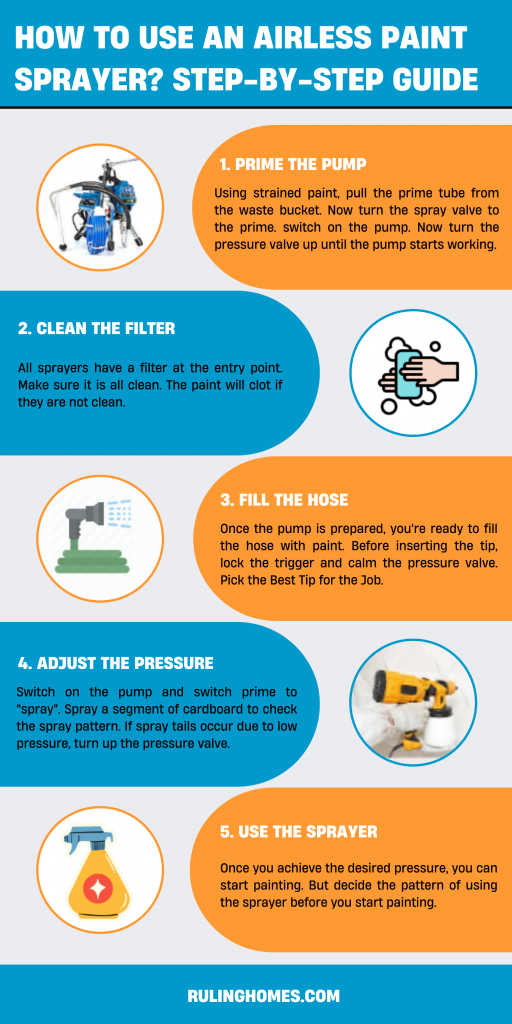
Step 1: Prime the Pump
Find the prime tube in a waste bucket and pull the tube in the bucket of strained paint. Now you need to turn the prime/spray valve to “prime.” The next step is to switch on the pump.
Now you have to turn the pressure valve up until the pump begins working at the point when the paint begins moving from the big cylinder into the paint container.
Step 2: Clean the Filter
Regardless of whether you lease or purchase an airless sprayer, there are a couple of key things to consider. All sprayers have a filter at the entry point. Make sure it is all clean.
Most sprayers additionally have a removable filter close to the pump and another in the handle of the airless spray gun. Check both to ensure they’re in perfect condition. In case they are not clean, it will clot the paint and not work properly.
Step 3: Fill the Hose
Hold the airless paint sprayer over the waste container and pull the trigger. Change the valve to the “spray” setting. Check the trigger when the paint is streaming in a constant flow from the gun. Lock the trigger and follow the “pressure valve relief steps.”
When the pump is prepared, you’re prepared to fill the hose with paint. At that point, lock the trigger and calm the pressure valve before inserting the tip.
Steps for Pressure Relief:
- Turn the power switch off.
- Turn the spray/prime valve to prime.
- Point the spray gun against the side of the waste bucket and pull the trigger to check the pressure.
- Connect with the trigger lock.
Step 4: Pick the Best Tip for the Job
Spray tips slide into an opening in the front of the airless paint sprayer gun. They’re named with a three-digit number like 309 or 517.
Multiplying the primary digit discloses to you the spray fan width with the gun held 12 in from the surface. A 415 tip, for instance, would have an 8-in.- wide fan, while a 515 would have a 10-in. fan design.
A 411 tip would function admirably for spraying stain on woodwork, while a 517 is a decent size for spraying enormous surfaces with latex paint or other best paints for wood.
Step 5: Adjust the Pressure
Turn on the pump and move the prime/spray switch to the “spray” position. Spray a segment of paint across a piece of cardboard to check the spray pattern for its consistency.
On the off chance that the spray design has tails, the pressure valve is set excessively low. Turn up the pressure valve.
Too little pressure will bring an uneven spray design. What’s more, a lot of pressure causes unreasonable overspray and untimely tip wear.
Take a chance to use a tip with an average opening. On the off chance that the spray design is round instead of tight, the tip is worn and needs a replacement.
Step 6: Use the Sprayer
Once you achieve the desired pressure, you can start painting. But decide the pattern of using the sprayer before you start painting.
Spray Strategies:
Press the trigger before you arrive at the corner of the surface. Move the sprayer rapidly across the surface, keeping it corresponding to the surface. The consistent movement of the trigger makes an even paint layer.
Plan your spraying action before you start. On doors, for instance, spray the corners first. Then move the airless paint sprayer side to side.
- Press the trigger while the gun is out of the way, and afterward, move it onto the surface you want to paint.
- Move the gun corresponding to the surface, not in a bend.
- Keep the gun opposite to the surface, not loosened.
- Move quickly to forestall runs. A few thin coats are superior to one thick one.
- Cover your strokes around 30 to 50 percent.
Clear a Clotted Tip:
If paint prevents streaming or pauses from the gun, the tip might be clogged up. Turn the tip 180 degrees. Point the gun at a piece of paper and press the trigger to clear the clogging. Turn the tip 180 degrees to point it forward again and spray a test strip onto the piece.
Most spray issues are an aftereffect of clogged up channels, a clogged tip, or a pump that is either spilling at the pressure or has stocked valves. Careful cleaning of airless paint sprayer and appropriate upkeep will avoid a large portion of these inconveniences.
Different issues, like uneven paint, are created by utilizing the wrong tip size or absence of spraying experience. Likewise, with most physical works, practice is the way to progress.
Airless Sprayer Safety:
Here are the main ones:
- Keep the trigger bolted and follow the pressure valve safety system when you quit spraying, before cleaning, and prior to replacing the sprayer or inserting new tips. Never put your hand before the sprayer tip except if the unit is off and depressurized. The high-pressure spray can infuse paint under your skin, causing a severe accident. If the spray penetrates your skin, get to a specialist right away.
- Wear safety glasses and a respirator when you’re spraying.
- Work in a ventilated zone.
Conclusion:
When you’re spraying combustible oil-based items, follow all safety precautions to prevent accidents. Read your manual or ask the rental store for directions on using the gun and metal bucket before you put in the best paint for the walls.

I grew up on a small farm in New Jersey. We had a big family because my parents, my uncles and aunties all were living together on this farm so, you can imagine, it was always over crowded with people. But living in farm was really great because we had to do everything on our own and I learned so many things from my parents and uncles and aunties and that is where I found my passion for fixing things, whether it is renovating or designing, I was always there. Read more